Pages

Showing posts with label Photos. Show all posts

Wednesday, February 24, 2010

Snow, Snow and More SNOW!

We thought we were beginning to get a break from all the snow. See in the photo below the icicles are dripping and there's a part of the yard that's bare? With these good signs I was well on my way to my annual trick of talking myself into March being spring around these parts. After all, George even cleaned all the snow off the grill last night and grilled our steaks -- spring has to come now, right?


All afternoon the snow has been thickly falling. Beautiful, but this means spring is on hold for a while longer.


Post Title Snow, Snow and More SNOW!

Friday, November 20, 2009

The Brown Time of Year

All the leaves are down, leaving a drab, brown landscape. Until we get some snow to brighten things up I'd better learn to like brown.

The interesting thing is, that late fall is beautiful in it's own unique way. I bet you are wondering why I don't have any interestingly beautiful late fall photos in this post. Well, the fact is, I don't have any at my fingertips. You have to look a little deeper to get some great photos with all the seemingly drab scenery. Spring and summer with their abundance of fresh green splendor just beg for a photograph.

I've been going through my digital photos and this morning and was hit with just how green spring and summer are around here. Such a contrast to what we've got now.

Here's a few photos from around our place in greener times.


Post Title The Brown Time of Year

Monday, November 9, 2009

Home for the (Stress Free) Holidays


The holiday season brings numerous occasions for us to gather with friends and family to share fellowship and a meal or some delicious homemade treats. By the 3rd invitation, finding time to make yet another potluck dish or treat for work feels pretty overwhelming!

I love getting together with friends and family to share a bite to eat and all the festivities of the holidays. And, as much as I love to cook and bake, it can be a bit much at times to make our regular meals and foods for special events. After all, I don't want to spend all my time in the kitchen!


One of the ways I make the holiday season a little less stressful is to pick one or two favorite dishes the freeze well to bring to get togethers. I then make up a big batch all at once and pop them in the freezer and take them out as needed.

One of my tried and true freezer recipes is Carrot Cake. Carrot Cake mixes up easily, thaws and serves beautifully. This weekend I made up 4 carrot cakes for the freezer. These 4 should* last me through the season. I'm a little nervous though, my husband saw me frosting them and was eyeing them pretty closely. I might get up one morning and find one half eaten in the fridge.

Here's my recipe for Fabulous Homemade Carrot Cake

2 1/2 cups all purpose flour
2 tsp baking soda
1 tsp cinnamon
2 cups sugar
1 cup oil
2 tsp vanilla
2 eggs
2 cups shredded carrot
15 oz can crushed pineapple (well drained)
1/2 cup chopped nuts (optional)
1/2 cup raisins (optional)


Icing


1 8oz pkg cream cheese
1 lb powdered sugar
2 tsp vanilla
Enough milk to make spreadable


Cake Instructions:

Heat oven to 350 degrees. Grease a 9X13 pan. In a medium bowl, combine flour, baking soda and cinnamon. In a large bowl combine sugar, oil, vanilla and eggs; beat well. Stir in flour mixture; mix well. Stir in carrots, pineapple raisins and nuts. Pour batter into pan. Bake for 50 to 60 minutes. Cool completely, frost and freeze (or eat).


Icing Instructions:


Soften cream cheese. Beat in vanilla and 2 Tbsp milk. Add powdered sugar. Mix and add in just enough milk to make the icing spreadable as you are mixing.


This post is linked to Tempt my tummy Tuesday and WFMW.

Post Title Home for the (Stress Free) Holidays

Tuesday, September 8, 2009

Meet Kai

You know the old saying that families only get together at weddings and funerals. Well that's kind of true for our family. You can always count of the biggest turn out at those events. Since we don't get to see each other as often as we would all like we break out the cameras to create some photos for posterity.

Below is a photo of George and I with my little nephew Kai.


Here's just the two of us. My sister is really lucky I let her get back on the plane with this little guy.


Post Title Meet Kai

Sunday, July 5, 2009

The View From Our Place and Request for Garden Help

I hope you had a lovely July 4th holiday. On Friday I went to visit my mom and do some errands. We stayed home for the rest of the weekend and worked in the yard and garden. Even though we worked hard, we did manage to have a bon fire and grill some hamburgers. Here are a few photos taken after all the hard work was done.


Here's a shot of what I think is Purple Salvia at the corner of the front porch. The hummingbirds love it. Speaking of hummingbirds... All of the nesting hummingbird pairs on our property have had their babies and boy are they ever hungry! We are going through about 8 cups of sugar water a week. I just love sitting out by the feeder watching them swoop in for a quick meal.


Here are the two tomato plants we are babying. These are the plants I picked up early in the season (which for us is the 2nd week of May). I planted them up close to the house so I could cover them each night. The left one has really taken off and has several clusters of green tomatoes. The right one took some mole damage and half the plant is down. It also didn't help that I planted this guy too close to a mum, so it didn't get as much water and nutrients as it needed.A couple of weeks ago we dug it up and put it in a bucket to prevent the moles from further damaging the roots.

See the rustic trellis? George made two of these for me this year. We've got morning glories coming up at the base of each leg. Usually we sit just to the right of the large tomato plant and watch the hummingbirds at the feeder.


See this giant round circle of dirt. The previous owners used this as their fire pit. It's about 14 feet in diameter -- they must have had some really big fires. Nothing will grow there. I mean absolutely nothing. We even transplanted some weedy type grass and it's not taking off.

I need your help.

This weekend we finally decided to give up on trying to grow grass in this area and that we (I) could do whatever I wanted with it. Here are the two things I would love to do with this space

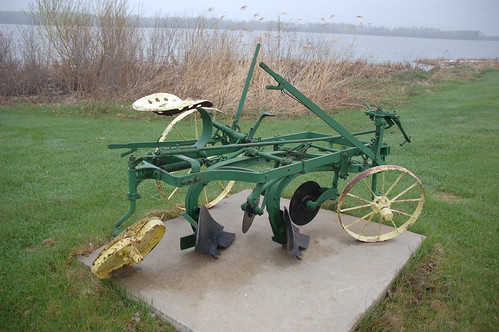
1.) Fill it in with mulch (or stones) and then put a piece of old fashioned farm machinery in the center. On the sides will be small 1/2 whiskey barrel tipped on their sides with mounds of wave petunias spilling out. Go here to see plantings similar to what I'm talking about. You can go here, here and here to see the old farm machinery I'm thinking of.

2.) Fill it in with mulch (or stones) and then put an antique wagon in the center. I would then fill the wagon with all kinds of flowers, making sure to include some vines that would trail down the sides to the ground. Go here, and here and here to see this kind of a wagon, this one looks like a manure spreader, but it would do.

The key here is to have some kind of vertical element. Preferably something that says "old fashioned country life" and lots of flowers. In the fall it would look so nice to do a harvest theme with corn stalks, straw bales and pumpkins. The only problem is I don't have any old wagons or plows lying around. I plan to check with all the neighbors to see if they know of any, and I'll run an ad in the local paper. I thought about asking George to make me a wagon, or at least a very large wheel borrow out of old wood, but his free time is very limited right now.

Here's where you can help -- please share any ideas of how I can make this circle a showpiece and creative ways for obtaining the supplies. Please leave your ideas in the comment section or email me. Thank you!


I couldn't resist sharing this beautiful fountain with you. George's brother David bought this fountain 3 years ago in anticipation of giving it to us as a wedding gift. After he painstakingly painted it, he filled it with water and plugged it in to see how it looked. David decided he liked the fountain so much, that he left it up for awhile to enjoy before shipping it off to us. During this time his neighbor was dying of cancer; one of his neighbor's small pleasures in life was sitting outdoors enjoying the garden and listening to this fountain.

One day the neighbor told David how much he enjoyed hearing the sound of this fountain, so David promptly brought the fountain over to his neighbor's garden and hung it close by so he could enjoy the sound and the beauty of the fountain. When David gave us this fountain he was apologizing for it being used, we are delighted to know our wedding gift brought so much happiness to someone in their last day. I think of that man every time I look at it.


Here's a shot of our beds on the side of the house. This year I'm doing impatiens and begonias in various shades of pink. Hostas are in the back. This weekend I snagged several pots of wave petunias at half off on the clearance rack at Lowes, so I put those into hanging planters. Hopefully the get growing fast -- I'm about a month behind on getting those started.


This is the area behind our garage. It is covered in pretty heavy shade for most of the day. We are going with all shade plants back here -- impatiens, jack-in-the-pulpit, hosta, and a few others that I don't know the names of. We would like to do ferns too, but the ground doesn't stay wet enough.


Here's Barney wanting to come out and help. The mosquitoes are so bad right now that they will just about eat you alive. George and I wear long sleeves, pants, hats, and sometimes a hooded sweatshirt if we can stand the heat and all the bug spray we can handle. We can't exactly dress Barney and then dip him in bug spray so he stays inside a lot of the time until the mosquitoes aren't so bad.


I just love the hydrangeas in the foreground and the blue something-or-others in the background. Can you tell I'm not real big on plant names?


This weekend, we picked our first mulberries and blackberries. I'm going to use this recipe and make a blackberry-mulberry-rhubarb crisp today.


Here's our work clothes hanging on the line. You can always tell how good of a day you've had by how dirty you get. Well, maybe not always. Now that I'm a grown up, I have lots of good days that don't involve getting dirty. When I was a little kid I measured how good my day was by how dirty my feet got. My sisters and I used to get so dirty that Mom made us site on the side porch and scrub our feet with a brush and soapy water before we could come in to bed. Those were some very good days indeed.


Post Title The View From Our Place and Request for Garden Help

Friday, July 3, 2009

The 6th Picture Game

Have you heard of the 6th Picture Game? I first saw it on lifeasMOM. The gist of the 6th Picture Game is that you go to your online photo files and pick out the 6th picture in the line up, post it on your blog and tell others a little about the photo.

Here's my 6th photo from my Picasa files. Now I'll tell you a little about it.


This picture brings back so many memories for me. It's a photograph of my newly remodeled kitchen taken around June of 2005. This is in my old house where I lived before getting married to George. It was a beautiful little Cape Cod style home in a nice family friendly neighborhood. The home was junk when I bought it, but you could see it had good "bones". Over time, I slowly remodeled and redecorated it so that it was a beautiful, comfortable little home. Oh, how I loved living there.

The kitchen was one of the final areas to be remodeled. This was the first time I ever lived in a home with a nice, new kitchen - all of my own choosing. What a wonderful feeling, boy was it ever hard to let someone else take over "my" kitchen when I sold the place. Sometimes I still want to walk in there and see if the new owners have done anything to wreck "MY" house.

Let's take a little tour...

See the stove on the far left? It was the first gas stove I ever cooked on, boy did it take a while to get used to cooking with gas! See the white cast iron sink -- it's heavier than you would ever want to lift. It had deep bowls and a little extra room for big pans which was terrific. However, it needed to be bleached often once the finish wore off. On the right side of the sink, you will see my beloved Old Towne Blue Corelle Ware dishes. My sister bought me a set of these for my 23rd birthday. They are still my favorites today. So simple and you got to love the blue trim.


Take a look at the shelf above the kitchen sink. I've always had a thing for plants on the kitchen window sill, but most window sills aren't wide enough to hold any kind of sizable plant. George made this extra wide shelf out of oak to match the cabinets. The sunlight streaming in amongst the white lace curtains and green plants was so beautiful each morning. He also made the plant shelves on the sides of the cabinets. That's where I used to start all my new baby plants.

See the bowl of fruit? For some reason, I've always liked to keep a bowl of fruit out on the counter -- it just looks so pretty. The upper half of the room is wallpapered, although I really like this pattern, this was my first and LAST wall papering job. George has strict orders to never, ever allow me wallpaper anything, no matter how much I beg and plead about how pretty it will look after the mess. And, there are people do this for a living?!

Here's a funny thing...

I still have everything in this photo that's not nailed down. The dishes, flower pots, curtains, watering can, canisters, coffee pot and can opener cover. My life is like that. Once I find something I like, I stay with it until the very end and then I go out and get another one just exactly like the one that broke or wore out. It is a sad day in my world when they stop making something I love and had hoped to continue using until the day I die. Oh sure, every once in a great while, I will want to try out something different and new, but not very often. See all the permanent stuff in the photo, like the cabinets, sink, stove? I guarantee you that if I had to pick out all these things new today, they would be exactly the same. Even the paint and wallpaper. How boring huh?

Perhaps the really disturbing part of all this is that I LIKE being this way, and George is the same way. He repeatedly buys the exact same tools, lights, clothes, trucks, hats, gloves, etc. We even painted the interiors of our homes the same colour before marriage. And we were both deliriously happy to paint our new home the very same colour. Other than that, we try very hard to be normal :)

Want to play too? Pick out your 6th picture, post it and tell us a little about it. If you put something up, please leave a link in the comment section to let us know.

Thanks!


Post Title The 6th Picture Game

Tuesday, May 12, 2009

Trixie's Quick and Tasty Mexican Casserole

I'm a big fan of Qdoba. If you've never been to Qdoba, you don't know what you're missing. They have these giant burritos topped with every kind of delicious topping you can imagine. You have the option of ordering their burritos "naked", which is just the insides of the burrito in a dish. You can forgo the tortilla all together or enjoy it on the side. I've never had anything from the Qdoba that I didn't like.

After extolling the virtues of Qdoba food, here's where I mention the only drawback: it ain't cheap.

One day while eating their Ancho Chile Burrito -- served Naked Style, I started lamenting the fact that I couldn't make the same thing at home for less. And then it occurred me to ask myself, why I thought I couldn't make it at home. Ahhhh the light bulb moments. Sometimes they result in ideas that make you a millionaire over night or a great new recipe. I quickly concocted a recipe for Quick and Tasty Mexican Casserole.


Last week I tried out the new recipe for the first time. My husband just loved it. As a matter of fact, he said he wouldn't mind eating it once a week, which is high praise from him. So I'm sharing it here for you folks.

The basic recipe is very simple. This dish is mostly about the toppings. Who wouldn't like rice, beans and chicken once you've topped it with a myriad of deliciousness?

See that 8x8 casserole dish to the right? It never saw the oven. After heating the rice, beans and chicken separately I layered them in the dish starting with the rice and ending with the chicken to make serving easier.

Quick and Tasty Mexican Casserole

1 cup of uncooked white rice
1 15 oz can of black beans (drained)
2 cups cooked diced chicken
1/2 cup bbq sauce
1/2 tsp cumin
1/2 tsp chili powder
1/2 cup of water

Toppings of Your Choice

We like the following:

diced onion
sliced black olives
diced tomatoes (you could also use pico de gallo)
salsa
sour cream
cheddar cheese
guacamole


Because the toppings are what really make this recipe great, the first thing to do is figure out what toppings you would like to top this casserole with and get those set up into serving dishes.

Following package directions, cook one cup of white rice until done . (Make sure to wash the rice several times if you don't want sticky rice). While the rice is cooking, take 2 cups of pre-cooked diced chicken and place in a medium sauce pan. Then add 1/2 cup of your favorite bbq sauce, 1/2 tsp cumin, 1/2 tsp chile powder and 1/2 cup of water to the saucepan. Heat on med-low until mixed well and the sauce is hot. The sauce should be fairly thin. Warm the black beans until hot.

Once the rice is cooked, and the chicken and black beans are hot, layer these items into an 8x8 baking dish: rice first, then beans, then chicken. You have the option of serving each of these items in their own separate dishes but I like to use the one dish method. Easier to serve and less clean up.

Set out the "casserole" and all the toppings and have everyone dish up their own. This recipe would be good served with tortilla chips and queso dip, but it is so filling you don't really need any sides at all.


Here's a photo of how everything looks before you serve it up.


Yes, I really did eat all this. Was it ever good.

Post Title Trixie's Quick and Tasty Mexican Casserole

Sunday, May 10, 2009

Race Day Recap

We had a great time at the races on Saturday. Thankfully we didn't have any rain, but it was very cold and windy. Very cold and windy. The upside to this was we had the place to ourselves. And got a fabulous parking place. So good that we could just run right over to the truck and get warm when we needed to.

The other upside was that most of the race goers were more interesting in keeping warm than getting drunk. Most people drank hot coffee and shivered inside their coats and blankets wishing they had worn long under ware. This was a welcome change from the August races where some big hairy drunk guy dripping in sweat plops down beside you and proceeds to take off his shirt.

Racing is a sport that many people think is only for younger men. I thought that too until I started paying attention to the announcer. I just love it when a person that doesn't fit into the typical racer stereotype is at an event! I've seen grandmas, teenage girls, husband and wife teams and octogenarians. Yesterday there were two older guys that did fantastic -- one was 81, the other in his early 70's. It is a great reminder to not let life pass you by. Whatever your thing is, get out there and keep doing it until God calls you home.


On the drive there (when I'm wide awake) we take all the back roads and just enjoy the beautiful scenery. The drive home is a constant loop of me fighting to stay awake to keep George company while he drives, pouring coffee from the thermos and then nodding off.

In spite of being cold, and not getting home until 1 am, we had a fantastic time. After church, we had lunch and took a 3 hour nap to make up for the lack of sleep last night. Here's some photos from our day. My apologies for the formatting on the photo descriptions -- Blogger was not cooperating.


This is Blastro. Believe it or not, it's street legal. Isn't this the coolest Astro
van you have ever seen. I'm just sorry I couldn't get a better photo. This van
is hauled in a trailer that is almost a cool as the car.


Interior shot of Blastro. Not big on creature comforts,
but I guess you don't really need a cup holder in a
race car.


These types of cars are interesting because the whole body
lifts up. Many racers bring a whole 'nother body with them in
case they wreck. The big time racers also bring enough parts
to build a whole new car from scratch-- engine and everything.
I find that amazing, considering it might be an all day project
for me to change the oil.


My all time favorite type of vehicle at any drag race is
the jet powered variety. They make lots of noise and go
super fast and there's fire. Lots and lots of fire. A girl couldn't
want anything more.

The jet vehicles are what's called an Exhibition Vehicle. They don't race to see who
wins. The track hires them to come and put on a big show to entice more
people to buy a ticket to the races. Much to my disappointment
these jet vehicles only run twice at any event I've ever gone to.
This vehicle is from Les Shockley's ShockWave line of jet vehicles
.


Do you see how much fire that is? Awesome!


Here he is gearing up to take off. This particular vehicle
has two jet engines and burns 100 gallons of diesel for
each run.


You see a lot of old 60's and early 70's muscle cars.


This is another exhibition vehicle. It does wheel stands.
Please note, while this vehicle is neat, it is not nearly as
fun because there is only a very small amount of fire.


One interesting thing to note about the tires on this vehicle.
The entire tire is completely smooth -- no tread of any kind. The tire
walls are so lax that they are wrinkled. That's the Trixie description.
The official description is Wrinkle Wall Drag Slicks. It's weird to think
that you could drive anywhere on tires like that.


This is an ancient history dragster from the 1970's. Dragsters
look very different today and are built with more safety features.
This car was probably the least safe car out of any we've ever seen at
any racing event. If anything goes wrong in this vehicle you are as
good as dead. I'm not sure if this car was for exhibition or was racing.
That's George talking to the driver in the background. He wants to sit in it but
is hesitant to ask. He likes stuff that goes fast as much as I do.


This photo goes with the one above. Look at the bright pink
parachute in the photo above -- that's where the driver sits.
You cannot see the racetrack when racing. What you see
in this photo is all you see while you are going 200 miles per hour.


Racers have many occupational hazards. In this car (same one as
above) the driver is literally sitting on the gear box. Gear boxes frequently
blow up. See that metal thingy that looks like a handle at the top of
the photo? That's the steering wheel. Not very luxurious are they?


*Regarding the slogan on the gear box above.
Boys and boys and men are grown up boys.
I thought it was hilarious.


Post Title Race Day Recap

Tuesday, March 3, 2009

Buget Saver Dinners: Pot Pie

One of my favorite budget saver dinners is a pot pie. Pot pie is an easy, tasty way to use up any sort of left over meat. Here's my recipe with step by step photos. Want an easier, weeknight version? Just open a jar of gravy and a bag of frozen mixed vegetables and voila! Instant Pot Pie, it works for me.


Ingredients

2 cups leftover beef, diced (using just one cup works well too)
½ cup chopped onion
½ cup peas
½ cup corn
1 rib celery, diced
1 carrot, diced
1medium potato, diced
2 Tbsp flour
2 cups water
2 Tbsp Beef Bullion Base
1 2 crust pie crust
Dash of Mrs. Dash
Dash of black pepper
1 Tbsp milk

Preheat oven to 350 degrees. Assemble all ingredients. (See step 1). Blend flour into the two cups of water. Pour into a small sauce pan. Add 2 Tbsp of the beef bullion base, a dash of black pepper and a dash of Mrs. Dash and whisk. (see step 2) Bring to a boil and whisk constantly for 2 minutes to make beef gravy. Mixture should look like the step 3 photo. Pour all assembled ingredients except milk including the gravy into a large mixing bowl. Mix well.

(step 4) Line the bottom of a 10 inch round pie plate or an 8 x 8 baking dish with one of the pie crusts.(step 5) Spoon pot pie mixture into the bottom pie shell. (step 6). Top with second pie crust and pinch edges closed. Baste pie crust with the milk, (this makes for the most tender, flaky crust you can imagine). Cut a hole in the center and pop into the oven. Bake at 350 degrees for 50 minutes.

Easy version: instead of using individual vegetables and making your own gravy, you can use a 16 oz bag of frozen mixed vegetables and a 12 oz jar of beef gravy. It works just as well. This pie is also delicious when made with chicken.


Step 1: Assemble Ingredients


Step 2: Start Gravy


Step 3: Finish Gravy


Step 4: Mix it all Together


Step 5: Line Your Baking Dish with Pastry


Step 6: Add the Filling


Step 7: Baste Pie Crust with Milk or Cream, Cut Hole for Venting


Step 8: All Done!


Post Title Buget Saver Dinners: Pot Pie